01The concept
A normal ducker turns the whole track down when the sidechain plays. TT-FREIRAUM MINI works per frequency: it looks at the spectrum of the sidechain and removes from the main signal exactly the frequency bins where the sidechain has energy, and only inside one band. A vocal over a pad takes out the pad's energy at the vocal's own frequencies; the pad's other notes keep playing. A kick over a bass takes out the bass only under the kick, only in the low band.
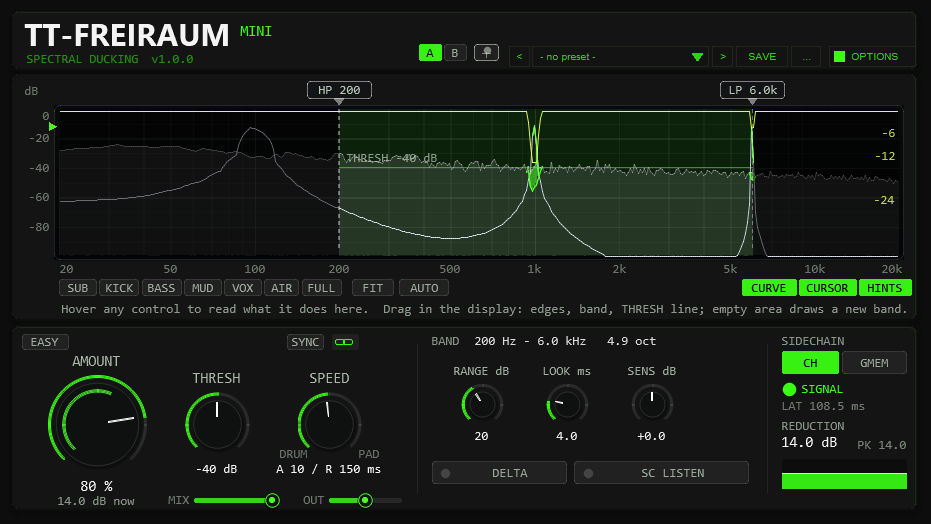
The engine is the same spectral engine as in TT-FREIRAUM (8192-point transform, 8x overlap, attack and release per sample, lookahead). MINI shows what you need for one band and helps you set it fast. The front at the default size is shown in the header of this manual and in the section UI Size & Saved Options.
02Quick start
- Insert TT-FREIRAUM MINI on the track that should make room (pad, bass, music bus, reverb return).
- Give that track 4 channels and send the trigger track (vocal, kick, lead) to channels 3/4 of it. The SIDECHAIN box lights SIGNAL when audio arrives; until then it shows how to route it.
- Start playback. Click a band chip (KICK, VOX ...) or press FIT: MINI listens to the sidechain for 1.5 seconds and places the band around its energy.
- Press AUTO: MINI sets THRESH 8 dB below the sidechain peak inside the band (lowest −80 dB; a peak just above that also raises SENS, a quieter one shows SIDECHAIN TOO QUIET).
- Turn AMOUNT until the trigger sits clearly in front. The inner ring of the knob shows the reduction right now.
- Set SPEED: towards DRUM for drums, middle for vocals, towards PAD for pads and returns.
- Hold DELTA for a moment to hear what is removed; release it to hear the normal output.
In a hurry: switch on EASY and use AMOUNT alone. Low values give a gentle, slow and soft result, high values a fast and hard carve.
03Sidechain routing
CH (recommended): the sidechain comes from input channels 3/4 of the same track. In REAPER set the track to 4 channels and create a send from the trigger track to channels 3/4. This path is sample-exact and works in playback and render alike.
GMEM: the sidechain comes from another track over a shared-memory link. Put TT-FREIRAUM SEND on the trigger track (it is installed with TT-FREIRAUM) and keep ALIGN on in the sender, then the ducking is on time during playback. The link adds 2048 samples of latency. Use it when a send to channels 3/4 is not practical.
Status: SIGNAL / NO SIGNAL in CH mode, LINK OK / NO SENDER in GMEM mode. While nothing arrives, the box shows a short routing hint instead of the reduction meter. If the trigger simply is not playing at that moment, the hint is expected.
04The display
Grey is the main signal, white the sidechain, green under the grey curve is what is removed right now. The band is the bright area; everything outside it is dimmed because nothing is ducked there. Inside the band the sidechain curve turns green where it rises above THRESH, so you see what triggers the ducking. The triangle at the left edge marks the recent sidechain peak inside the band; if nothing crosses the line, BELOW THRESH appears.
| Gesture | What happens |
|---|---|
| Drag the HP or LP line, or its tab | Moves that edge. Shift snaps to third-octave steps. Double-click or right-click resets it (250 Hz / 4 kHz). The edges stay at least half an octave apart and below 0.45 × the sample rate. |
| Drag inside the band sideways | Moves the whole band; its width stays and it stops at the ends. |
| Drag inside the band up or down | Sets THRESH (the direction you move first decides). |
| Mouse wheel inside the band | Widens or narrows the band by 1/6 octave per notch around its centre. |
| Drag on empty space outside the band | Draws a new band from where you pressed to where you release. |
| Drag the THRESH line | Sets THRESH; right-click = −40 dB; double-click = AUTO. |
| Right-click inside the band | Resets the band to 250 Hz – 4 kHz. |
While you drag, a bubble shows the frequency, the nearest note and the band width in octaves.
Below the display: band chips SUB (30–90 Hz), KICK (40–200 Hz), BASS (60–300 Hz), MUD (150–600 Hz), VOX (300 Hz–5 kHz), AIR (5–16 kHz), FULL; then FIT and AUTO, which listen to the playing sidechain for 1.5 seconds (the display must be open). On the right three view switches: CURVE draws the reduction per frequency as a yellow line (top = 0 dB, scale to 24 dB), CURSOR shows a hairline with the main, sidechain and output level at the mouse, HINTS shows a line that explains the control under the mouse (or describes the loaded factory preset).
05Controls
| Control | Range | What it does |
|---|---|---|
| AMOUNT | 0–100 % | How much of the sidechain energy is removed inside the band. The inner ring and the line below the knob show the reduction right now. |
| EASY | on/off | AMOUNT also sets SPEED and RANGE: low = gentle (slow, soft), high = hard carve (fast, hard). The word next to the switch names the character (SPACE, POCKET, CARVE). EASY also follows AMOUNT automation while the window is closed; with SYNC on, release stays with the tempo. Turning SPEED, ATK, REL or RANGE by hand switches EASY off. |
| THRESH | −80…0 dB | Sidechain level where ducking starts. Same as the line in the display. |
| SPEED | 2/50 … 50/500 ms | One knob for attack and release (shown as A / R). DRUM = attack 2 ms, release 50 ms; PAD = 50 / 500 ms; the middle is about 10 / 150 ms. The chain icon splits it into separate ATK (2–100 ms) and REL (50–500 ms) knobs. |
| SYNC | 1/32 … 1/4 | Release follows the project tempo as a note value; click the readout below SPEED to step through 1/32, 1/16, 1/8, 1/4. The result is limited to 50–500 ms. While SYNC is on, release belongs to the tempo; turning the REL knob (split SPEED) switches SYNC off. |
| RANGE | 3–48 dB | How far the sidechain must rise above THRESH for full ducking. Small = hard, on/off carving; large = soft and gradual. It is not a limit on the reduction; AMOUNT sets the depth. |
| LOOK | 0–20 ms | Lookahead: delays the main signal so the cut starts at the transient. Adds latency. A new instance starts at 4 ms. |
| SENS | −24…+24 dB | Sensitivity inside the band: boosts or softens the detected sidechain. Above +12 dB a quiet sidechain reaches full reduction without making the sidechain track louder, as long as it rises above THRESH (SENS scales the reduction, it does not lift the sidechain over the threshold). |
| MIX | 0–100 % | Blend of the ducked signal; 100 % = full effect. The label turns green when it is not at its default. |
| OUT | ±12 dB | Level after ducking, to match the bypassed level. |
| REDUCTION | readout | Strongest cut in any frequency bin right now, PK = recent peak, and a strip with the last three seconds (0–24 dB). |
Knobs: drag up/down, Shift for fine steps, mouse wheel, right-click, double-click or Ctrl-click for the default. Every control has a tooltip; OPTIONS > TOOLTIPS switches them off, the HINTS line works independently.
06Listening and comparing
DELTA plays only what is removed, SC LISTEN plays the sidechain that drives the ducking. A short click switches the mode on until you click again; holding the button longer than about a third of a second plays the mode only while you hold it (closing the window while holding also ends it). While either mode is on, a green bar replaces the subtitle in the header; click it to return to the normal output.
A / B in the header compares two settings: click the other letter, the current setting stays in its slot and the other one loads (an empty slot starts as a copy). A slot holds every setting including MIX, SC SOURCE, EASY, SYNC and the SPEED split. The slots are kept until the project is closed.
07Presets
The preset bar in the header loads factory presets and stores up to 32 own presets with the project. A factory preset sets AMOUNT, THRESH, the band, SPEED (attack and release), LOOK and SENS; its description appears in the HINTS line. With PIN (the pin icon left of the preset bar) on, loading a preset keeps your band and changes only the rest.
| Preset | Band | Character |
|---|---|---|
| Vocal > Pad | 300 Hz–5 kHz | medium, room in the mids |
| Kick > Bass | 30–250 Hz | fast, attack 3 ms with 3 ms lookahead |
| Gentle > Bus | 150 Hz–8 kHz | light and slow |
| Any > Hard Carve | 100 Hz–10 kHz | deep and fast, 5 ms lookahead |
| Lead > Pads | 400 Hz–6 kHz | medium |
| Snare > Room | 150 Hz–3 kHz | fast |
| Hats > Top | 5–16 kHz | very fast, top only |
| Vocal > Reverb | 200 Hz–10 kHz | slow release, for reverb returns |
| Quiet SC > Any | 250 Hz–4 kHz | THRESH −60 dB, SENS +12 dB |
08Latency & lookahead
MINI reports 4608 samples plus LOOK to REAPER (plus 2048 samples in GMEM mode); REAPER compensates it, so the track stays in time with the others. The SIDECHAIN box shows the value in milliseconds (LAT). For live monitoring through the plug-in this latency is audible.
09MINI and TT-FREIRAUM
TT-FREIRAUM is the full version of the same engine: three zones with their own attack and release, a pre-EQ on the sidechain, a learn snapshot, zone solo and smoothing. MINI keeps one band; the pre-EQ is flat and the zone settings stay at their neutral defaults. Use TT-FREIRAUM when one band is not enough, for example when lows and highs need different speeds.
10Troubleshooting
- Nothing happens, NO SIGNAL: the track needs 4 channels and the send must go to channels 3/4.
- SIGNAL, but no reduction, BELOW THRESH: press AUTO or lower THRESH; raise SENS for a quiet trigger; check that the band covers the green part of the sidechain curve.
- FIT or AUTO say NO SIDECHAIN: they need playback and an open plug-in window, because they listen to the display.
- Clicks on kicks: move SPEED a little towards PAD and set LOOK to about the attack time.
- Sounds hollow: narrow the band, lower AMOUNT or raise RANGE; hold DELTA to hear what is taken out.
- GMEM: NO SENDER: TT-FREIRAUM SEND must be on the trigger track with SEND on; it comes with TT-FREIRAUM.
11Changelog
1.0.0 — First public release
- First public release as Drop 06 of Acid Season, together with TT-FREIRAUM 1.0.0.
- FIT and AUTO count only the time the plug-in window is open.
0.10.0 — New front
- Display: band in focus, sidechain highlighted where it crosses THRESH, peak marker, CURVE, CURSOR and HINTS.
- Band: drag, move, wheel, draw a new band, chips, FIT from the sidechain; AUTO sets THRESH.
- Controls: AMOUNT with a live reduction ring, EASY, SPEED split and SYNC, RANGE, MIX and OUT on the front, LOOK starts at 4 ms.
- DELTA and SC LISTEN latch or act while held, with a header bar; A/B compare; PIN for presets; presets named by job.
- Sidechain box: latency, reduction history, routing hint. Audio engine unchanged.
0.9.0 — First version
- One-band spectral ducking on the TT-FREIRAUM engine with AMOUNT, THRESH, SPEED, HP/LP, LOOK, SENS, DELTA, SC LISTEN, 9 factory presets.
UI Size & Saved Options
Updated in v1.0.0. New instances open at 125% UI size for clearer text. The controls and text are redrawn at the selected size; the colour scheme and background retain their appearance.
Open OPTIONS and choose UI SIZE: 100% / 125% / 150% / 200% / 300%, or click the percentage field and enter a whole number from 25 to 400. Enter or a click outside the field applies it; Escape cancels the edit. Values outside the range are limited to the nearest supported value.
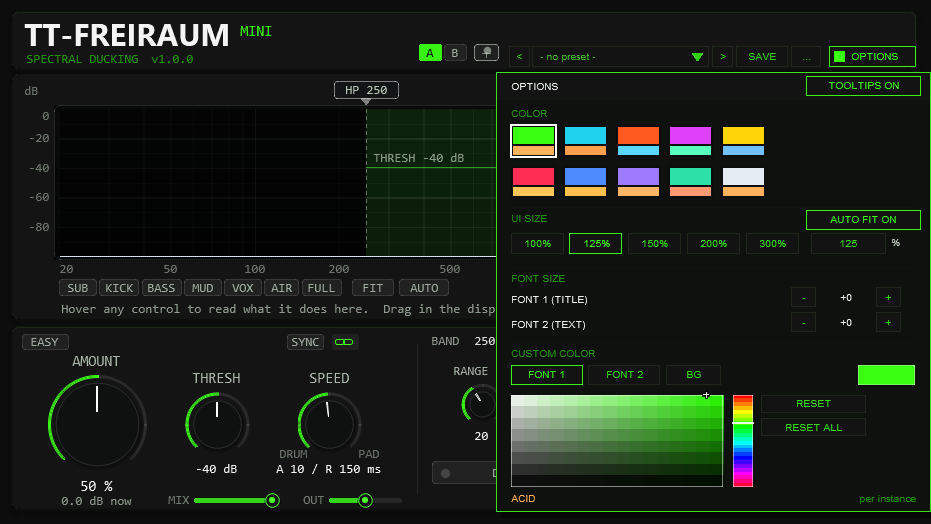
AUTO FIT. When you drag the edge of the FX window, the front rescales to the new window size (the largest whole percentage that shows the whole front, 25 to 400 %) and the scrollbars disappear. The UI SIZE buttons and the percentage field still set a fixed size, which stays until you change the window again. AUTO FIT ON / OFF in the UI SIZE row of OPTIONS switches the rescaling off for this instance; the setting is saved with the project. Switching it on fits the front to the current window at once.
If the enlarged front exceeds the host window, use the horizontal and vertical scrollbars to reach every control. The mouse wheel over a scrollbar moves that view. OPTIONS stays visible at the upper right. You can also enlarge the REAPER FX window to show more of the front.
All OPTIONS settings are saved per instance: UI size, colour scheme, title and text font sizes, custom title/text/background colours, colour-picker target, and TOOLTIPS ON / OFF. Closing and reopening the FX window keeps them; saving and reopening the project restores them. They also travel with FX chains and native REAPER FX presets. Save the project to keep changes between sessions.
The sound presets in the plugin's own preset bar retain the instance's appearance settings. Older projects and style blocks remain readable; projects that predate UI SIZE use the new 125% default.